Masking Clean Lines and Canopies
The Small Preparation Step That Makes a Big Difference
You’ve laid down a smooth base coat, and the next color is ready to go. Perhaps your aircraft needs a sharply defined camouflage boundary, your race car needs a contrasting stripe, or your fighter’s canopy needs neatly painted frames around crystal-clear windows.
This is where masking earns its place on the workbench.
Masking simply means protecting selected areas of your model while you paint the areas around them. It sounds straightforward, but a little practice can make the difference between a crisp, convincing finish and one with fuzzy edges, paint seepage, or damaged clear parts.
Fortunately, clean masking is a skill you can learn with a few inexpensive tools. The same basic principles apply whether you’re using a brush, spray can, or airbrush.
What Does Masking Actually Do?
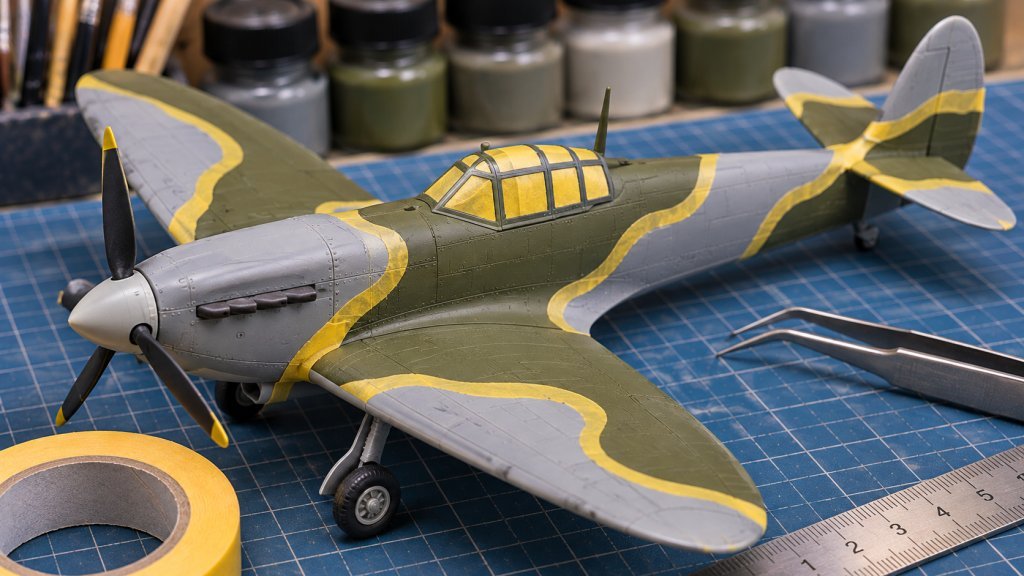
A mask creates a temporary barrier between a painted surface and the next color you plan to apply. On scale models, it serves two closely related purposes.
Protecting an area means keeping paint off something that must remain unchanged, such as a completed color coat, a landing light, or a transparent canopy window.
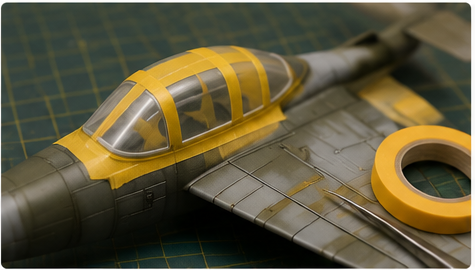
Defining an edge means deliberately establishing where one color ends and another begins, such as the separation between an aircraft’s upper camouflage and lighter underside.
Hard Edges and Soft Edges
Not every camouflage boundary should look identical.
A hard edge is crisp and sharply defined. It is common on canopy framing, color bands, many vehicle markings, and certain camouflage schemes. Tape or a well-fitted stencil is usually the easiest way to create it.
A soft edge has a subtle transition between colors. Some full-size aircraft and vehicles were spray-painted freehand, so a slightly feathered edge may be more accurate. A raised mask or carefully controlled airbrushing can produce that effect.
Check references before deciding which look your model needs. Masking should help reproduce the finish of the real subject, not force every paint boundary into the same style.
Basic Masking Tools for the Workbench
You don’t need a drawer full of specialty products to begin. A few reliable materials will handle most projects.
| Tool or Material | Best Use | Important Consideration |
|---|---|---|
| Hobby masking tape | Straight lines, color boundaries, canopy panels | Choose thin, paint-safe tape made for models; ordinary household tape may grip too aggressively |
| Narrow or flexible fine-line tape | Tight curves, stripes, rounded panels | Narrow widths follow curves more easily and are less likely to wrinkle |
| Pre-cut canopy masks | Aircraft with many small or complex windows | Confirm the mask set matches the exact kit and variant |
| Liquid masking product | Irregular shapes and small areas that are difficult to cover with tape | Check compatibility with clear parts, paints, and any protective coatings |
| Sharp scissors or cutting mat and knife | Preparing mask shapes away from the model | Cut on a safe surface whenever possible; avoid scoring clear plastic |
| Blunt toothpick, soft swab, or silicone tool | Settling tape edges into surface contours | Use light pressure; hard tools can scratch or crack delicate parts |
| Fine tweezers | Positioning and lifting small masks | Keep sharp tips away from transparent glazing |
| Clean paper or suitable masking film | Covering large areas behind a precisely taped edge | Secure the covering so spray cannot enter underneath |
Why Dedicated Hobby Tape Helps
Good modeling tape is thin and conforms to small details without leaving the bulky ridge that a thick household tape may create. It also tends to be easier to position and remove from properly cured model finishes.
Even dedicated hobby tape can lift weak paint, though. No tape is safe on every surface or every coating, so testing still matters.
Plan Your Painting and Masking Sequence
The cleanest mask can fail if it’s applied at the wrong stage of the build.
Before painting, ask yourself:
- Which color should go down first?
- Which finished areas need protection before the second color?
- Are any clear parts going to be installed before exterior painting?
- Will the mask need to cross rivets, panel lines, or raised details?
- Does the real subject have a hard boundary or a soft camouflage transition?
For many two-color schemes, painting the lighter color first is convenient because covering it with a darker color may take fewer coats. But this is not an absolute rule: shape, opacity, assembly order, and the manufacturer’s recommendations may suggest a different sequence.
A Simple Two-Color Example
Imagine an aircraft with a light gray underside and an olive-drab upper surface.
- Prepare and prime the model if your paint system requires it.
- Apply the light gray color and allow it to cure sufficiently for masking.
- Follow the intended camouflage boundary with a carefully positioned strip of tape.
- Cover the remaining underside so overspray cannot reach it.
- Apply the olive-drab color in light, controlled coats.
- Remove the masks when the coating is ready according to the product instructions.
- Inspect the boundary and correct any small defects.
A few minutes spent planning the order now can prevent an awkward touch-up later.
Prepare the Surface Before Applying Tape
Masking works best on a clean, dry, sound finish.
Dust and fingerprints can reduce adhesion at the tape edge, allowing paint to creep underneath. A weak or incompletely cured underlying coat can lift when the tape comes away.
Check the Paint, Not Just the Clock
Paint that feels dry to the touch may not be sufficiently cured to resist masking. Curing time varies with the product, layer thickness, humidity, and temperature.
Follow the manufacturer’s recommendations for handling and masking. If the paint still feels soft or tacky, wait rather than hoping the tape will be gentle enough.
Make a Quick Tape Test
Before masking an important paint job, try the same tape on a similarly prepared and painted spare part.
Let the test coating cure as directed, place the tape, press its edge gently, and remove it using the technique described later in this guide.
If paint lifts, don’t simply use a weaker press. Check surface preparation, paint compatibility, curing, and whether the tape is suitable.
How to Mask a Clean, Straight Paint Line
Let’s start with one of the most useful techniques in all of scale modeling: a sharp boundary between two colors.
Step 1 - Choose a Reference Line
Use the kit’s instruction diagram, a measured marking location, a panel boundary, or a reference photograph to establish the edge.
For a stripe, measure both ends so it doesn’t gradually widen or drift across the model.
Step 2 - Place the Tape Without Stretching It
Lay a thin strip along the intended boundary. Work a short section at a time and reposition as needed.
Avoid pulling hard on the tape while positioning it. Stretching can make it spring back or lift at the edges later.
Step 3 - Burnish Only the Edge
Use a clean cotton swab, a smooth wooden toothpick, or another blunt tool to press the tape’s paint-facing edge into the surface.
Pay special attention where the tape crosses recessed panel lines, joins, raised rivets, or overlapping pieces of tape. These are common places for seepage.
Step 4 - Protect the Larger Area
Once the precision edge is established, cover the rest of the area with additional tape, suitable film, or clean paper.
Don’t rely on a narrow strip to stop all overspray. Paint can travel much farther than you expect, especially when airbrushing.
Step 5 - Apply the Second Color in Light Coats
Avoid flooding paint against the tape. Several controlled passes are usually safer than one heavy, wet coat.
When spraying, don’t aim directly under the tape’s exposed edge. Control the angle and distance so paint lands on the intended area rather than being driven into gaps.
Step 6 - Remove and Inspect
Allow the paint to reach the removal stage recommended for your paint and masking products, then lift the mask slowly and inspect the edge under good light.
A sharp color boundary with no raised paint ridge is the goal.
Keep Paint From Bleeding Under the Mask
Paint bleed happens when the new color works its way beneath the edge of the mask. It is especially noticeable on contrasting colors, such as black against white or yellow against dark green.
The most common causes are:
- Tape edges that are wrinkled, dirty, or not fully seated.
- Small gaps over raised rivets, recessed lines, or overlapping tape.
- Too much wet paint deposited along the boundary.
- A spray angle that pushes paint toward an exposed gap.
- Masking over a rough, dusty, or unsuitable finish.
Four Habits That Reduce Bleed
- Use the narrowest practical precision edge. A thin strip is easier to place flat than a wide piece forced over complex contours.
- Check corners and overlaps. Burnish the edge gently again just before painting, especially where several pieces meet.
- Keep the paint application controlled. Thin, compatible layers reduce the chance of paint pooling along the line.
- Don’t treat every edge with extra sealer. For many models, correctly applied tape and restrained painting are enough. Add a sealing step only when it solves a known problem and has been tested.
If a little paint slips underneath, don’t panic. Small mistakes can often be touched up after the finish has dried sufficiently.
Masking Curves, Stripes, and Complex Camouflage
Straight lines are only the beginning. Wings, fuselages, automobile bodies, and military vehicles often have curves that resist ordinary strips of tape.
Use Narrow Tape for Tight Curves
Narrow tape can bend around a curve with fewer wrinkles. Flexible fine-line products can help with rounded bodywork and sweeping stripes.
Place the edge gradually rather than stretching it into shape. Where a curve becomes too tight, use several short sections or prepare a custom-cut shape away from the model.
Build a Curve From a Paper or Tape Template
For repeated shapes, lightly trace the intended boundary onto paper or a removable template material, then transfer it to masking tape on a cutting mat.
Cut the shape off the model and position it carefully. This protects finished paint and clear plastic from accidental blade marks.
Choose the Right Camouflage Edge
Some camouflage patterns have crisp boundaries. Others have visibly feathered transitions.
For hard-edged patterns, use well-seated tape or a suitable stencil. For a soft edge, a slightly raised paper mask or a small roll of compatible masking putty can leave a controlled feather when used with an airbrush.
Test putty first: some materials can stain paint, leave oily residue, or react with clear coats. Avoid forcing putty into delicate details.
Painting Stripes and Repeated Markings
Stripes look simple, but small alignment errors are easy to see.
Whether you’re painting wing identification bands, a racing stripe, or a two-tone vehicle body, measure before placing tape.
A Reliable Stripe Workflow
- Mark the intended stripe boundaries using the kit instructions and references.
- Apply the stripe color over the whole area it needs to cover and let it cure.
- Place two parallel masking boundaries at the correct distance apart.
- Protect the stripe area while painting the surrounding color, or protect the surrounding area when painting the stripe, depending on your planned sequence.
- Use light coats and inspect the mask edges before removing them.
- Remove the tape gently and touch up any defects after the paint is ready.
Check Alignment From More Than One Angle
A stripe can appear straight when viewed from above and crooked when viewed from the side. Rotate the model before spraying and compare distances from consistent reference points.
Canopies Are Different: Protect the Clear Parts
Aircraft canopies, vehicle windscreens, headlight lenses, and other clear parts deserve extra care.
On an opaque body panel, a minor paint mistake may be repairable with sanding or repainting. On a canopy, a scratch, glue fog, or cloudy finish may be much harder to hide.
Prepare Clear Parts Carefully
Inspect the canopy before masking. Remove visible mold residue and fingerprints using a cleaning method known to be safe for that plastic, and let it dry completely.
Handle the piece by its edges when possible. If the canopy was removed from a sprue, clean up attachment points gently without scratching the glazing.
Avoid aggressive solvents and unsuitable adhesives near transparent parts. Cyanoacrylate (super glue) fumes can fog clear plastic, so many modelers prefer clear-part adhesives or carefully selected PVA-type products when appropriate for the joint.
Decide Whether to Install the Canopy First
Some canopies are easier to mask and paint separately. Others benefit from being installed before exterior painting so the surrounding fuselage and frame can be finished together.
Either approach can work. Plan for protecting the cockpit opening and the inside of the glazing from overspray if necessary.
How to Mask an Aircraft Canopy With Tape
This method works particularly well for canopies with visible molded frames and windows large enough to outline with thin tape.
Step 1 - Identify the Frame Lines
Study the clear part under bright, angled light. The raised or recessed frame lines show where the painted structure should appear.
Use a reference photograph when the kit’s frame definition is faint or the instruction diagram is unclear.
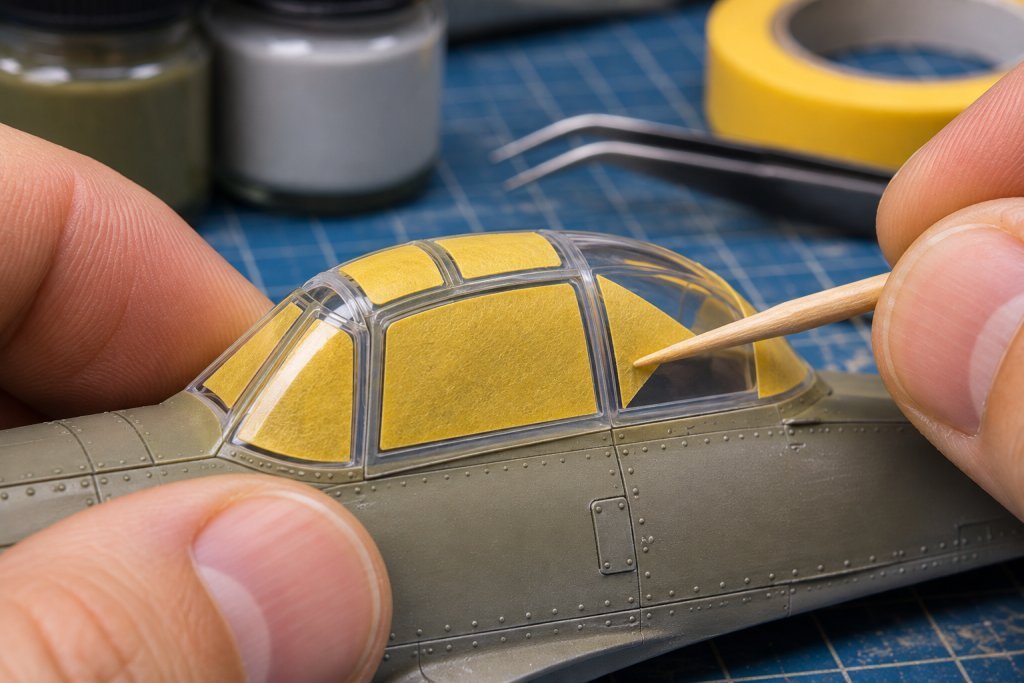
Step 2 - Outline a Window With Narrow Tape
Place a fine strip of hobby tape along one edge of the transparent window, keeping the adjacent frame exposed for painting.
Continue around the perimeter using manageable lengths. Align intersections carefully so there are no small uncovered gaps.
Step 3 - Fill the Center
When the perimeter is complete, fill the remaining transparent area with appropriately sized pieces of tape. Press overlapping edges down gently.
For some shapes, a product-approved liquid mask can fill the central opening, but only if it is compatible with the clear plastic and any existing coating.
Step 4 - Repeat One Panel at a Time
Work systematically from one window to the next. This is much easier than covering the whole canopy randomly and trying to recover the frame lines later.
Step 5 - Check the Entire Canopy
Hold it toward a light. Every section that must remain transparent should be fully protected, including small triangular windows and narrow side panels.
If you plan to paint the canopy while attached to the fuselage, also consider whether the cockpit interior or inside glazing needs protection.
Should You Cut Tape Directly on the Canopy?
Some experienced modelers use a fresh blade to trim tape along raised frames. It is a legitimate technique, but it carries a real risk of permanently scratching or scoring clear plastic.
For beginners, pre-cut masks or tape shapes cut away from the canopy are safer choices. If you do use on-part cutting, never press into the clear plastic, and practice first on a spare canopy.
Pre-Cut Masks and Liquid Masking Products
Not every canopy is easy to mask by hand. Some aircraft have dozens of tiny panes, rounded corners, or complicated framework.
Pre-Cut Canopy Masks
A pre-cut mask set includes adhesive shapes designed to fit the clear panels of a particular model kit.
For beginners, this is often the simplest option on a heavily framed canopy.
Check the manufacturer, scale, kit number, and sometimes even the precise boxing or variant. Two kits of the same aircraft may have different canopy shapes.
Place each piece carefully, align its edge against the molded frame, and press it down gently. Some sets supply only the outer perimeter; you may need to fill the center with additional tape or another approved masking material.
Liquid Mask
Liquid masking products dry into a removable film that protects the area beneath them. They can be useful for irregular shapes or areas that are difficult to cover with tape.
However, liquid masking products are not all interchangeable. Some do not work well over particular water-based paints, clear coats, or transparent plastics. Some are difficult to remove from tiny crevices.
Read the manufacturer’s instructions, test on spare material, and follow the recommended application, drying, painting, and removal procedure. Use a brush you can clean according to the product’s instructions.
Combining Tape and Liquid Mask
One useful approach is to define the crisp edge with tape, then fill the broad middle of a protected area with a compatible liquid product.
This keeps the precision boundary under your control while avoiding awkward overlapping tape in the center.
Painting Canopy Frames in the Correct Order
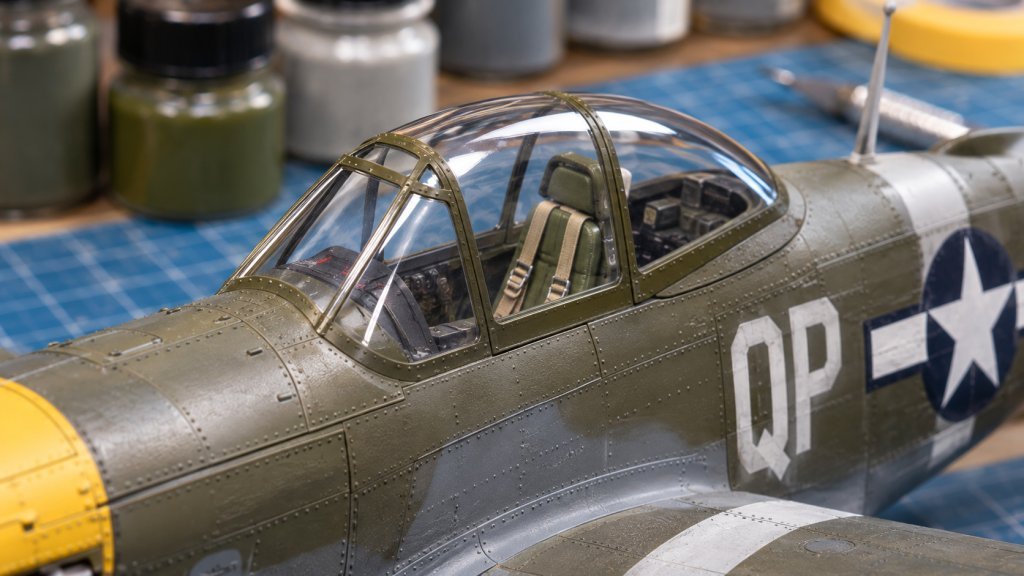
Once the transparent windows are protected, you can paint the exposed frame structure.
Many aircraft canopy frames are a different color on the cockpit side than on the exterior. Even when you spray only the outside of a clear canopy, the first opaque color you apply to the frame may be visible from inside through the clear plastic.
A Typical Canopy Painting Sequence
- Protect all window panes. Ensure the mask sits securely along the frame lines.
- Apply the interior frame color if appropriate. For example, an aircraft with a dark interior may have that shade visible from the inside of the canopy framing.
- Allow it to dry or cure according to the product instructions. Don’t rush directly into a heavy exterior coat.
- Apply the exterior frame color. Match the surrounding aircraft finish, such as green camouflage or natural-metal framing.
- Apply compatible finishing coats only when needed. Protect clear glazing from any matte or other clear coat that could cloud or alter its appearance.
- Remove the masking when the paint and mask products allow. Work slowly and inspect each panel.
This process creates convincing framework while preserving transparent windows.
A Note About Canopy Interiors
Painting the outside with an interior color first gives the appearance of interior-colored framing through the clear plastic. It is not the same as painting actual raised frame detail on the inside; some advanced builds use separate interior masks for that level of accuracy.
For a first attempt, a carefully masked outside frame is a significant improvement over painting it freehand.
Removing Masks Without Damaging the Finish
Removing the tape is satisfying, but this is also the moment when careless handling can ruin an otherwise clean paint job.
When Should You Remove Tape?
There is no single rule for every paint.
Some products are best unmasked after the new coating has become safe to handle but before a thick paint film hardens across the mask edge. Other products specify complete drying before removal. Liquid masking products can have different directions again.
Follow the paint and mask manufacturers’ instructions, and test unfamiliar combinations. Do not assume a fixed number of minutes works for every acrylic, enamel, lacquer, and clear coat.
How to Remove It
- Begin at an accessible corner and lift the tape with a fingernail or a blunt tool where practical.
- Pull the tape slowly back over itself at a low angle instead of straight up from the surface.
- Support fragile parts, especially canopies, while working.
- Stop if the paint begins to lift, stretches across the mask edge, or seems bonded to the tape.
- Reassess the problem rather than tearing the tape away.
Where a paint film bridges the masking boundary, separating it may help, but avoid dragging a knife across transparent plastic or delicate finished surfaces.
Inspect Under Good Lighting
Check for paint seepage, ragged edges, remaining adhesive, and missed areas. Fine corrections are easier to make now than after final assembly.
Fixing Small Masking Mistakes
Even carefully applied tape can allow a little paint underneath, especially around complex molded detail.
The repair should be appropriate for the paint and surface.
Small Bleed on an Opaque Painted Panel
If the edge is slightly uneven, let the affected paint reach a suitable state for touch-up, then use a fine brush and the original base color to correct the line.
For more noticeable defects, re-mask the boundary and carefully repaint a small area rather than trying to scrub at it while wet.
Paint on a Clear Canopy Window
Extra caution is essential. Strong solvents, abrasive polishing, and scraping can permanently damage glazing.
Depending on the paint and whether the clear part has a protective coating, a carefully controlled, non-abrasive method may remove a tiny error. Test any approach on a spare clear piece first.
Avoid assuming that a common thinner, alcohol, knife blade, or polishing compound is safe for your particular canopy.
Paint Lifted by Tape
If the underlying paint comes away with the tape, inspect the affected area and let it stabilize. Remove only loose material, address the preparation or compatibility problem, and rebuild the finish in thin coats.
A quick dab over peeling paint usually won’t produce a durable repair.
Common Masking Problems and How to Fix Them
Most masking problems come from the condition of the underlying finish, the way the edge was applied, or how paint was sprayed against it.
| Problem | Possible Cause | What to Do |
|---|---|---|
| Paint bleeds under tape | Edge not seated, raised detail, or overly wet paint | Burnish the edge gently and apply lighter coats; repair any bleed after the finish is ready |
| Underlying paint lifts | Paint not sufficiently cured, poor adhesion, or tape too aggressive | Stop removing the mask; investigate the finish, use compatible low-tack tape, and test first |
| Tape leaves sticky residue | Incompatible adhesive or tape left in place too long | Follow product guidance for removal; avoid aggressive cleaners on painted or clear surfaces |
| Curved tape wrinkles or pulls away | Tape too wide or stretched excessively | Use narrower flexible tape or a custom-cut mask |
| Paint forms a ridge along the line | Too many heavy coats at the boundary | Apply thinner coats; correct a cured ridge only if the paint can safely be smoothed |
| Camouflage edge looks too sharp | Hard mask used for a soft-edged reference scheme | Use a raised mask or controlled freehand spray technique on a future coat |
| Canopy glazing is scratched | Blade or tweezer contacted clear plastic | Avoid further abrasion; repair only with methods proven safe for that plastic |
| Canopy looks cloudy | Overspray, an unsuitable clear coat, or adhesive/solvent fogging | Identify the cause first; don’t apply harsh solvent or polish without testing |
| Tiny mask pieces remain | Many small canopy panes or tape difficult to locate | Inspect in angled light and remove gently with blunt tools or careful finger pressure |
The Most Important Masking Habit
Test your masking method on a painted spare part before trying it on a model you’ve spent hours building.
A small practice wing or scrap of clear sprue can reveal problems with paint adhesion, tape tack, liquid masks, and removal timing before they affect your finished work.
Frequently Asked Questions
Do I have to use expensive hobby masking tape?
Not necessarily, but dedicated hobby tape is usually much easier to handle on delicate scale-model surfaces. Ordinary household tape can be thicker, less flexible, and more aggressive. Test anything unfamiliar before using it on a painted model.
How long should paint cure before I apply tape?
Follow the paint manufacturer’s masking and curing instructions. Dry to the touch is not always sufficiently cured. If a coat is still soft or easily marred, wait longer and test before masking.
Is it okay to reduce the stickiness of masking tape?
Some modelers gently reduce tack on a clean surface before applying tape to a delicate finish. This can also introduce lint, oils, or dirt that encourage bleed. A genuinely suitable low-tack hobby product and a cured base coat are more reliable than treating contaminated tape as a universal solution.
Should I use liquid mask on every canopy?
No. Thin tape or a properly matched pre-cut set is often more predictable. Use liquid mask only when it offers a practical advantage and is compatible with the clear plastic and paint system.
Can I cut masking tape directly on a clear canopy?
Experienced modelers sometimes do, but a sharp blade can permanently score the glazing. For beginners, trimming shapes on a cutting mat or using pre-cut masks is a safer approach.
Can I brush-paint over masking tape?
Yes. Keep the brush reasonably lightly loaded and avoid pushing wet paint beneath the edge. Brush direction and paint consistency matter just as much as the tape itself.
How do I mask a soft-edged camouflage pattern?
A slightly raised mask or a controlled airbrush technique can create a subtle transition. Test the distance between the mask and the surface, and practice the spray pattern before painting your actual model.
Should I remove the mask before or after a clear coat?
It depends on which areas need the clear coat and whether that product is compatible with the mask and underlying paint. In particular, protect transparent canopy glazing from a matte coat that would make it appear cloudy. Plan the finishing sequence and follow the product instructions.
What if masking tape lifts a decal?
Stop and avoid pulling on the damaged area. Decals may be especially vulnerable to tape, even after they appear dry. Use a compatible protective finish if appropriate, avoid masking directly over decals whenever possible, and test any planned combination first.
Your Clean Masking Checklist
Before applying the next color, make sure:
- I have checked references for a hard or soft paint boundary.
- The underlying paint is clean and sufficiently cured.
- My tape or masking product is compatible with the surface.
- I have tested unfamiliar materials on spare parts.
- The critical edge follows the correct line and lies flat.
- Corners, overlaps, and panel-line crossings are gently sealed.
- Large nearby areas are protected against overspray.
- Clear canopy windows and the cockpit interior are protected where necessary.
- I will use light, controlled paint coats rather than flooding the mask.
- I know the removal instructions for my specific paint and masking materials.
- I have inspected the result and corrected any small problems.
If those steps are covered, you’re ready for a much cleaner next color coat.
Final Thoughts: Precision Comes From Patience
Masking isn’t the most exciting part of finishing a scale model, but it can be one of the most rewarding.
A sharp camouflage boundary, a perfectly aligned stripe, or a canopy with clear windows and neatly painted frames can make a model look far more convincing.
The secret isn’t complicated equipment or extreme adhesive strength. It’s understanding the surface, choosing the right masking method, protecting what you’ve already painted, and taking care when you remove the mask.
Start with a straight line on a spare part. Practice a few gentle curves. Then try a simple canopy. Each successful attempt will make the next one less intimidating.
Happy modeling!
— Duneland Model Club
Continue Learning
These guides cover the preparation, brush control, and spray technique that make masking more effective.